![]()
Overview
Docker Connector, built using Docker Java API client, is a communication tool that provides seamless integration with the Docker engine from a mule flow. It exposes Docker operations by executing their API calls as per configuration. It supports HTTP and HTTPS connections and can be used as an inbound as well as outbound connector from the mule flow. Read through this user guide to understand how to set up and configure a basic flow using the connector.
Track features and API version updates using the Docker connector release notes. Review the connector operations and see how they work by reviewing the technical reference. alongside the demo applications.
Important Concepts
This document assumes that you are familiar with Docker, Anypoint Connectors, and Anypoint Studio. To increase your familiarity with Studio, consider completing a Anypoint Studio Tutorial. This page requires basic knowledge of Mule Key Concepts, Elements in a Mule Flow, and Docker.
Software Requirements
For software requirements, visit the Connector Release Notes.
How to Install
You can install the connector in Anypoint Studio using the instructions in Installing a Connector from Anypoint Exchange.
Additionally, we recommend you to keep Studio up to date with its latest version.
Connector Namespace and Schema
When designing your application in Anypoint Studio, when you drag the connector from the palette onto the Anypoint Studio canvas, studio automatically populates the XML code with the connector namespace and schema location.
Namespace: http://www.mulesoft.org/schema/mule/docker
Schema Location:
http://www.mulesoft.org/schema/mule/docker/current/mule-docker.xsd
Tip
If you are manually coding the Mule application in Studio’s XML editor or another text editor, define the namespace and schema location in the header of your Configuration XML, inside the
<mule>tag.
<mule xmlns="http://www.mulesoft.org/schema/mule/core"
      xmlns:xsi="http://www.w3.org/2001/XMLSchema-instance"
      xmlns:connector="http://www.mulesoft.org/schema/mule/connector"
      xsi:schemaLocation="
        http://www.mulesoft.org/schema/mule/core
        http://www.mulesoft.org/schema/mule/core http://www.mulesoft.org/schema/mule/core/current/mule.xsd
        http://www.mulesoft.org/schema/mule/http http://www.mulesoft.org/schema/mule/http/current/mule-http.xsd
        http://www.mulesoft.org/schema/mule/docker http://www.mulesoft.org/schema/mule/docker/current/mule-docker.xsd">

      <!-- put your global configuration elements and flows here -->

</mule>
Note: Use current in the schema path. Studio interprets this to
the current Mule version.
Maven Dependency Information
After you download and install the connector, use the following steps to
make the Docker connector available inside a Mule application for use
and to package the application with connector. If you use Anypoint
Studio, it will do this automatically for you.
For Maven dependency management, include this XML snippet in your
pom.xml file.
<dependency>
    <groupId>org.mule.modules</groupId>
    <artifactId>docker-connector</artifactId>
    <version>1.0.0</version>
</dependency>
Tip
Inside the
<version>tags, put the desired version number, the wordRELEASEfor the latest release, orSNAPSHOTfor the latest available version. The available versions are:
1.0.0
How to Configure
Creating a New Project
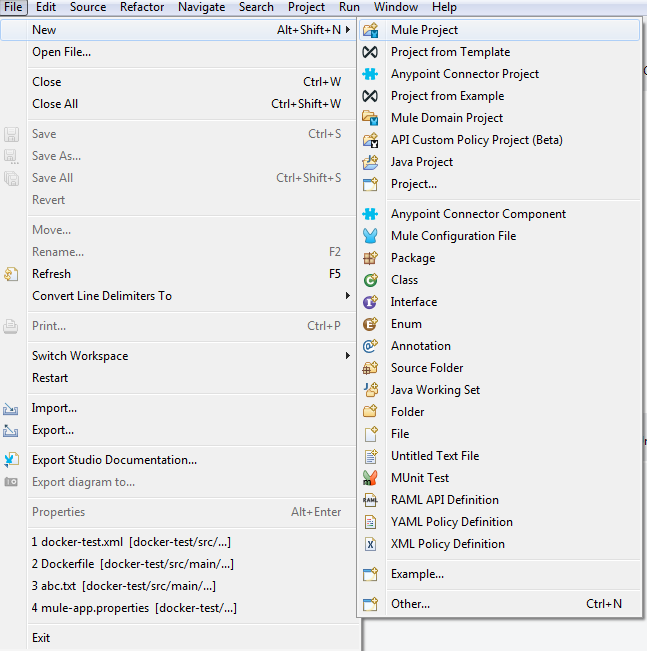
To use the Docker connector in a Mule application project:
-
In Anypoint Studio, click File > New > Mule Project.
-
Enter a name for your new project and leave the remaining options with their default values.
image:create-new-project-dialogue-box.png [Create new project dialogue box]
-
If you plan to use Git, select Create a default .gitignore file for the project with default ignores for Studio Projects, and then click Next.
-
Click Finish to create the project.
Configuring the Docker Global Element
Place the connector in your flow as applicable for your use case. To use the Docker connector in your Mule application, you must configure a global Docker element that is used by the Docker connector. The Docker connector provides the following global configuration(s).
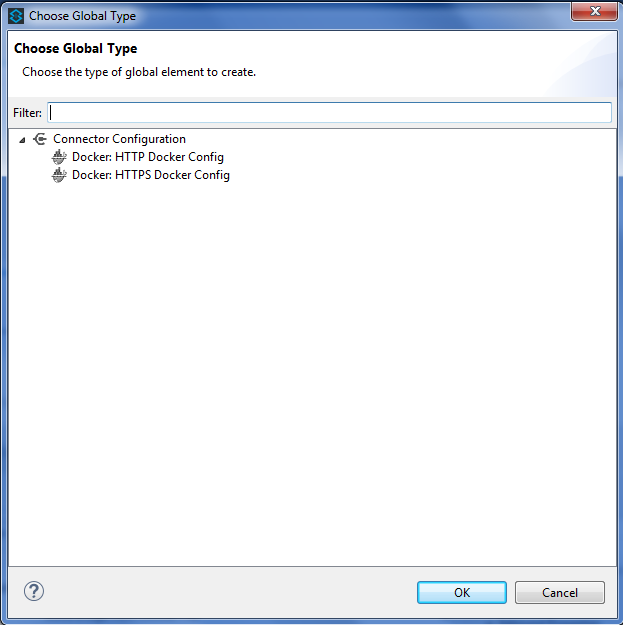
Note
To use this configuration you have to start docker daemon on TCP. By default the docker engine is using local UNIX sockets for communication with the docker CLI. Access Daemon socket option for detailed information about starting docker daemon on TCP.
Authentication
To access Docker you have following possibilities for a connection:
NO AUTHENTICATION
In NO AUTHENTICATION, you need to provide your docker host and port in a global configuration. No authentication is generally recommended for internal applications. To make the docker daemon listening on a HTTP port run following commands:
-
Stop Docker daemon if running:
$service docker stop -
Start Docker daemon on http:
$dockerd -H=0.0.0.0:2375
Tip
This will start docker daemon on port 2375. Now use docker host IP and port 2375 while making connection with docker daemon from Anypoint Studio using Docker connector.
CERTIFICATE BASED AUTHENTICATION
Implementing CERTIFICATE BASED AUTHENTICATION mechanisms involves a few extra steps, but ìs preferred if your Docker is exposed to external users, as it ensures better security.
-
Artefact required in CERTIFICATE BASED AUTHENTICATION
-
Certificates
-
CA certificate (ca.pem)
-
Server certificate (server-cert.pem)
-
Server key (server-key.pem)
-
Client certificate (cert.pem)
-
Client key (key.pem)
-
-
To make the docker daemon listening on a https, generate server and client certificates on docker host. Please refer Protect the Docker daemon socket for detailed information about protecting docker daemon and generating required certificates.
-
Start docker daemon on https using following command:
-
Stop Docker daemon if running:
$service docker stop -
Start docker daemon on https using following command:
$dockerd --tlsverify --tlscacert=ca.pem
--tlscert=server-cert.pem --tlskey=server-key.pem
-H=0.0.0.0:2376
-
Tip
This will start docker daemon on port 2375. Now, download and use ca.pem, key.pem and cert.pem while making connection with docker daemon from Anypoint Studio using Docker connector.
Note
Access Daemon socket option for detailed information about starting docker daemon on HTTPS.
Following parameters are required for HTTP configuration:
| Field | Description |
|---|---|
| Docker Host | Enter the docker host IP or Host Name to connect. |
| Docker Host Port | Enter the port of docker engine. |
| Docker API version | Enter the corresponding docker engine API version. |

Note
To use this configuration, you have to start docker daemon on http as mentioned in NO AUTHENTICATION.
- Following parameters are required for HTTPS configuration:
| Field | Description |
| Docker Host | Enter the docker host IP or Host Name to connect. |
| Docker Host Port | Enter the port of docker engine. |
| Docker API version | Enter the corresponding docker engine API version. |
| Client certificate directory path | Enter directory path of certificate required in TLS communication (ca.pem, cert.pem, key.pem) |
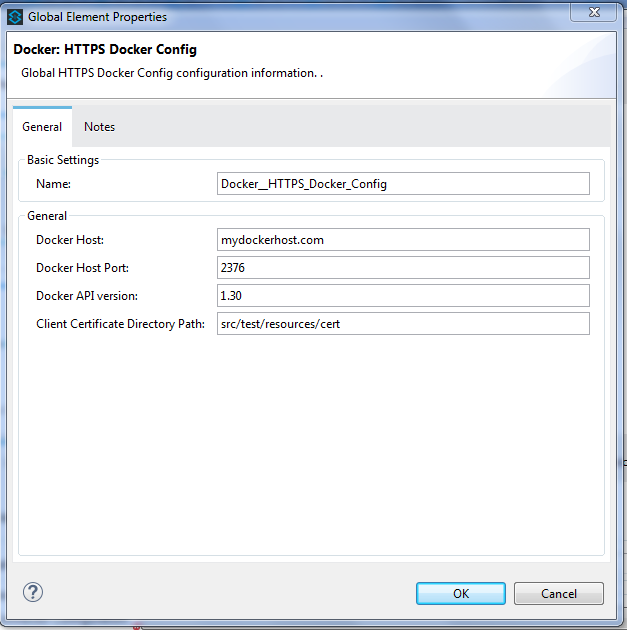
Note
To use this configuration, you have to start docker daemon on https as mentioned in CERTIFICATE BASED AUTHENTICATION.
Understanding the Docker Connector
The Docker connector functions within a Mule application. Using the connector, your application can perform several operations that Docker exposes via their APIs. When building an application that connects with Docker, such as an application which executes in docker container, you don’t have to go through the effort of custom-coding (and securing!) a connection. Rather, you can just drop a connector into your flow, configure a few connection details, then begin application running in Docker.
The real value of the Docker connector is in the way you use it at design-time in conjunction with other functional features available in Mule.
-
DataSense DataSense extracts metadata for Docker standard response to automatically determine the data type and format that your application must deliver to, or can expect from, Docker. Mule does the heavy lifting of discovering the type of data you must send to, or be prepared to receive from Docker.
-
Transform Message Component This component’s integrated scripting language called DataWeave can automatically extract response metadata that you can use to visually map and/or transform to a different data format or structure. Essentially, DataWeave let’s you control the mapping between data types. For example, if you configure a Docker connector in your application, then drop a Transform Message component after the connector, the component uses DataWeave to gather information that DataSense extracted to pre-populate the input values for mapping. In other words, DataSense makes sure that DataWeave knows the data format and structure it must work with so you don’t have to figure it out manually.
Operations
To see all possible operations, expected parameters and returned data for the connector, see the list of Technical Reference Docker API docs.
Outbound
You can use Docker connector as an outbound connector in your flow to call different docker operations with parameters. Use the connector in your flow at any point after an inbound endpoint.
Example
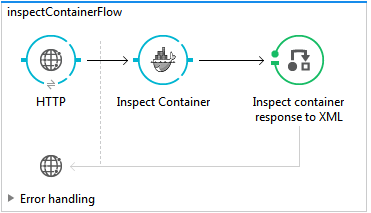
-
HTTP connector - Accepts HTTP request to executes flow.
-
Docker Inspect Container - Connect to Docker host and get the low level details of the provided container name.
-
Object to XML - Converts the Docker response into XML. This XML response is returned as HTTP response.
Inbound
Use the connector in conjunction with a Poll Scope in a flow to pull data from Docker host into your application. You must first place a Poll scope element at the beginning of your flow, then place a Docker connector within the poll scope.
Example: Inspect container and toggle container state:
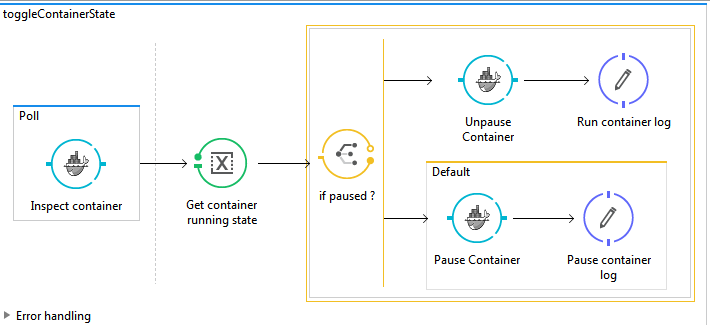
-
Poll scope - Regularly polls for Inspect Container.
-
Docker connector - Connects with Docker host, and performs an operation Get container statistics.
-
Variable - Record state of container from container statistics.
-
Choice - Choice flow controller use state of container and route flow to pause or unpause container.
-
Docker connector - Pause running container or unpause paused container.
Streaming Inbound
Use as an inbound connector, without wrapping in a poll scope, to stream data from Docker into your application. To use the connector in this capacity, place a Docker connector at the start of your flow.
Example: Get the statistics stream of docker container :
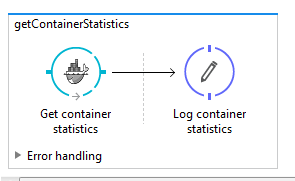
-
Docker connector - Listens to notifications on a topic and feeds the data into the flow.
-
Logger - Logs the extracted container statistics.
Common Use Cases
-
In Anypoint Studio, click File > New > Mule Project, name the project, and click OK.
-
In the search field, type http and drag the HTTP connector to the canvas.
-
Click the HTTP connector, click the green plus sign to the right of Connector Configuration, and in the next screen, click OK to accept the default settings.
-
In the Search bar type docker and drag the Docker connector onto the canvas.
-
Click the green plus sign to the right of Connector Configuration to select among the HTTP or HTTPS configuration.
-
Fill the IP or Host Name, port number ( and client certificate directory path in case of HTTPS) and select OK.
-
Create Dockerfile in src/main/resources/docker and add content as below :
FROM ubuntu:latest
# copy the  application to the container:
COPY runapp.sh  /
# Define working directory:
WORKDIR /
CMD  ["/bin/sh","runapp.sh"]
- Create runapp.sh file in src/main/resources/docker and add content as below:
#!/bin/bash

while :; do echo "Now `date`"; sleep 1; done
-
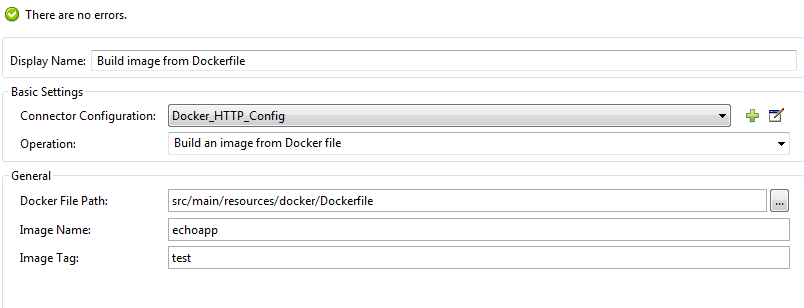
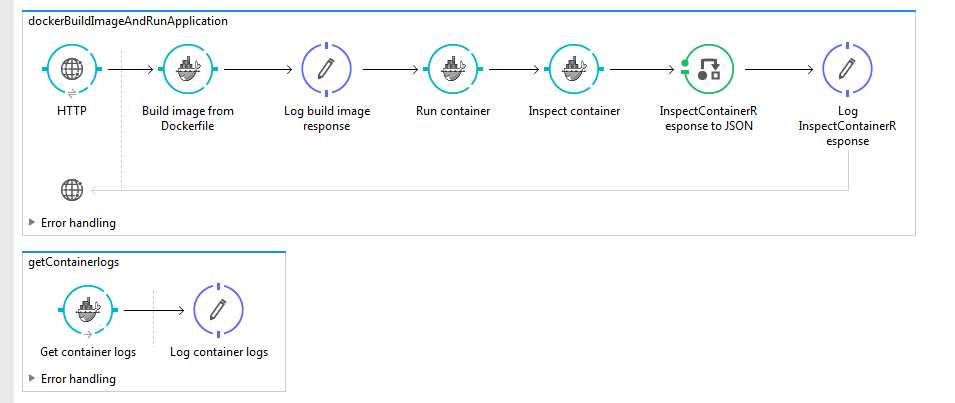
From the operation window select the Build Image from Docker File operation. Enter parameters required to this operation.
Parameters looks like :
-
Drag the logger onto the canvas and log
#[payload]to log low level information of built image. -
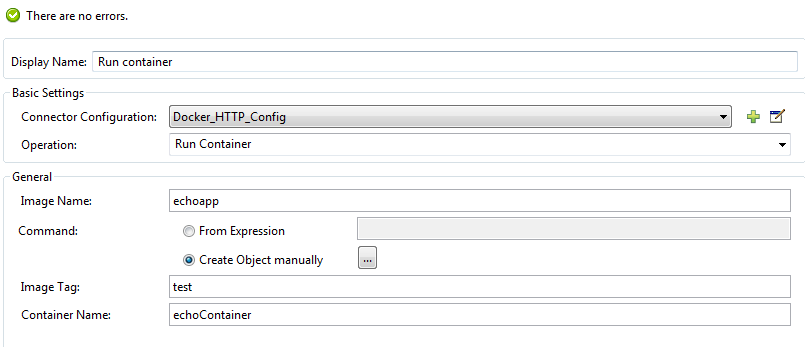
Drag the Docker connector onto the canvas, and select Run Container operation. Configure Run Container as below:
-
Drag the Docker connector onto the canvas, and select Inspect Container operation. Enter container name same as specified in Run Container.
-
Then drag the Object to JSON Transformer onto the canvas to return JSON response.
-
Drag the logger onto the canvas and log
#[payload]to log low level information of Inspect Container. -
Add new flow and drag Docker connector at the beginning of flow(in source). Select getContainerLogs operation and enter name of container same as specified in Run Container.
-
After you create the flows, right-click the project name in the and click Run As > Mule Application.
Example Use Case Code :
Paste this XML code into Anypoint Studio to experiment with the flow described in the previous section.
<?xml version="1.0" encoding="UTF-8"?>

<mule xmlns:validation="http://www.mulesoft.org/schema/mule/validation" xmlns:json="http://www.mulesoft.org/schema/mule/json" xmlns:context="http://www.springframework.org/schema/context" xmlns:tracking="http://www.mulesoft.org/schema/mule/ee/tracking" xmlns:http="http://www.mulesoft.org/schema/mule/http" xmlns:docker="http://www.mulesoft.org/schema/mule/docker" xmlns="http://www.mulesoft.org/schema/mule/core" xmlns:doc="http://www.mulesoft.org/schema/mule/documentation"
    xmlns:spring="http://www.springframework.org/schema/beans"
    xmlns:xsi="http://www.w3.org/2001/XMLSchema-instance"
    xsi:schemaLocation="http://www.springframework.org/schema/beans http://www.springframework.org/schema/beans/spring-beans-current.xsd
http://www.mulesoft.org/schema/mule/core http://www.mulesoft.org/schema/mule/core/current/mule.xsd
http://www.mulesoft.org/schema/mule/http http://www.mulesoft.org/schema/mule/http/current/mule-http.xsd
http://www.mulesoft.org/schema/mule/docker http://www.mulesoft.org/schema/mule/docker/current/mule-docker.xsd
http://www.springframework.org/schema/context http://www.springframework.org/schema/context/spring-context-current.xsd
http://www.mulesoft.org/schema/mule/json http://www.mulesoft.org/schema/mule/json/current/mule-json.xsd
http://www.mulesoft.org/schema/mule/ee/tracking http://www.mulesoft.org/schema/mule/ee/tracking/current/mule-tracking-ee.xsd
http://www.mulesoft.org/schema/mule/validation http://www.mulesoft.org/schema/mule/validation/current/mule-validation.xsd">
    <http:listener-config name="HTTP_Listener_Configuration" host="0.0.0.0" port="8081" doc:name="HTTP Listener Configuration"/>
    <context:property-placeholder location="mule-app-${ENV}.properties"/>
    <docker:HTTP-Docker-Config name="Docker_HTTP_Config" dockerHostIP="${docker.host}" dockerHostPort="${docker.port}" doc:name="Docker: HTTP Docker Config" apiVersion="${docker.APIVersion}"/>
    <flow name="getDockerInfo">
        <http:listener config-ref="HTTP_Listener_Configuration" path="/info" doc:name="HTTP"/>
        <docker:docker-info config-ref="Docker_HTTP_Config" doc:name="Docker"/>
        <json:object-to-json-transformer doc:name="Object to JSON"/>
        <logger message="#[payload]" level="INFO" doc:name="Logger"/>
    </flow>
    <flow name="dockerBuildImageAndRunApplication">
        <http:listener config-ref="HTTP_Listener_Configuration" path="/runapp" doc:name="HTTP"/>
        <docker:build-image config-ref="Docker_HTTP_Config" dockerFilePath="src/main/resources/docker/Dockerfile" imageName="echoapp" imageTag="test" doc:name="Build image from Dockerfile"/>
        <logger message="Build Image response: + #[payload]" level="INFO" doc:name="Log build image response"/>
        <docker:run-container config-ref="Docker_HTTP_Config" imageName="echoapp" imageTag="test" containerName="echoContainer" doc:name="Run container">
            <docker:command>
                <docker:command>/bin/sh</docker:command>
                <docker:command>runapp.sh</docker:command>
            </docker:command>
        </docker:run-container>
        <docker:inspect-container config-ref="Docker_HTTP_Config" containerName="echoContainer" doc:name="Inspect container"/>
        <json:object-to-json-transformer doc:name="InspectContainerResponse to JSON"/>
        <logger message="#[payload]" level="INFO" doc:name="Log InspectContainerResponse"/>
    </flow>
    <flow name="getContainerlogs">
        <docker:get-container-logs config-ref="Docker_HTTP_Config" containerName="echoContainer" showTimeStamp="true" standardOut="true" standardError="true" pollingPeriod="10000" doc:name="Get container logs"/>
        <logger message="#[payload]" level="INFO" doc:name="Log container logs"/>
    </flow>
</mule>
-
Please refer the previous use cases to set up and configure the Docker connector.
-
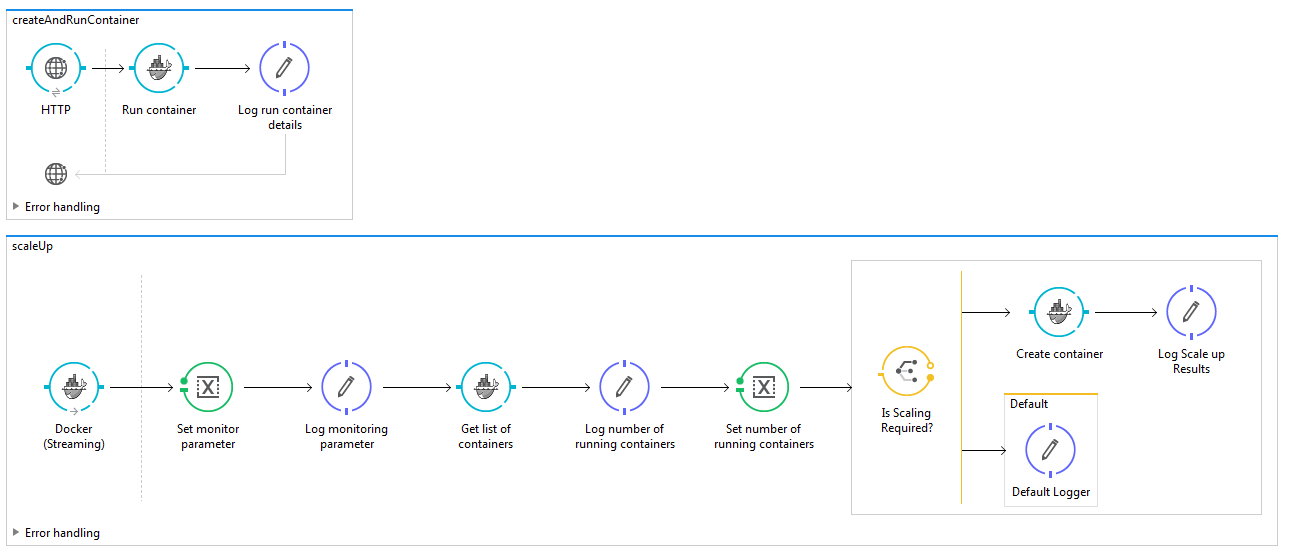
Scaling can be used in the scenarios where the demand for resources goes up or reduces suddenly. The use case implements the following operations of the Docker connector :
-
Run Container
-
Get Container Statistics
-
Get Container List
-
-
There are two different flows to execute the use case:
-
CreateAndRunContainer - It will run a new container which is to be monitored for resource consumption.
-
ScaleUp -
-
Get Container Statistics - To get the statistics of the container started in the previous flow.
-
Set Monitor Parameter - Assign the monitoring parameters like memory stats, CPU stats etc.
-
Get List of Containers - Get the list of docker containers running on the docker host.
-
Set Number of Running Containers - Assign the number of containers running on the docker host.
-
Is Scaling Required? - It acts as a decision maker for scaling based on number of containers already present on the host and IO activity.
-
Create Containers - Start a new container if exisiting container experiences high IO activity based on the decision of choice connector.
-
Default Logger - It is the default route if none of the conditions in choice connector gets satisfied.
-
Delete the newly created container manually by logging into docker host, and observe that new container will spawn again.
-
-
-
After you create the flows, right-click the project name in the and click Run As > Mule Application.
Example Use Case Code :
Paste this XML code into Anypoint Studio to experiment with the flow described in the previous section.
<?xml version="1.0" encoding="UTF-8"?>
<mule
xmlns:tracking="http://www.mulesoft.org/schema/mule/ee/tracking"
xmlns:json="http://www.mulesoft.org/schema/mule/json"
xmlns:http="http://www.mulesoft.org/schema/mule/http"
xmlns:docker="http://www.mulesoft.org/schema/mule/docker"
xmlns="http://www.mulesoft.org/schema/mule/core"
xmlns:doc="http://www.mulesoft.org/schema/mule/documentation"
xmlns:spring="http://www.springframework.org/schema/beans"
xmlns:xsi="http://www.w3.org/2001/XMLSchema-instance"
xsi:schemaLocation="http://www.springframework.org/schema/beans http://www.springframework.org/schema/beans/spring-beans-current.xsd
http://www.mulesoft.org/schema/mule/core http://www.mulesoft.org/schema/mule/core/current/mule.xsd
http://www.mulesoft.org/schema/mule/http http://www.mulesoft.org/schema/mule/http/current/mule-http.xsd
http://www.mulesoft.org/schema/mule/docker http://www.mulesoft.org/schema/mule/docker/current/mule-docker.xsd
http://www.mulesoft.org/schema/mule/json http://www.mulesoft.org/schema/mule/json/current/mule-json.xsd
http://www.mulesoft.org/schema/mule/ee/tracking http://www.mulesoft.org/schema/mule/ee/tracking/current/mule-tracking-ee.xsd">
<http:listener-config name="HTTP_Listener_Configuration"
host="0.0.0.0" port="8081" doc:name="HTTP Listener Configuration" />
<docker:HTTP-Docker-Config name="Docker__HTTP_Docker_Config"
dockerHostIP="${docker.host}" dockerHostPort="${docker.port}"
doc:name="Docker: HTTP Docker Config" />
<queued-asynchronous-processing-strategy
name="allow500Threads" maxThreads="500"
doc:name="Queued Asynchronous Processing Strategy" />
<flow name="createAndRunContainer">
<http:listener config-ref="HTTP_Listener_Configuration"
path="/standalone" doc:name="HTTP" />
<docker:run-container config-ref="Docker__HTTP_Docker_Config"
doc:name="Run container" containerName="runappApplication" imageName="runapp">
<docker:command>
<docker:command>/bin/sh</docker:command>
<docker:command>write.sh</docker:command>
</docker:command>
</docker:run-container>
<logger level="INFO" doc:name="Log run container details"
message="Flow CreateAndRunContainer executed successfully !" />
</flow>
<flow name="scaleUp" processingStrategy="allow500Threads">
<docker:get-container-statistics
config-ref="Docker__HTTP_Docker_Config" containerName="runappApplication"
doc:name="Docker (Streaming)" pollingPeriod="60000" />
<set-variable variableName="usage"
value="#[payload.memoryStats.stats.pgpgout]" doc:name="Set monitor parameter" />
<logger message="Log monitoring parameter pgpgout #[flowVars.usage]"
level="INFO" doc:name="Log monitoring parameter" />
<docker:list-containers config-ref="Docker__HTTP_Docker_Config"
showAll="true" doc:name="Get list of containers" />
<logger message="Number of containers already running #[payload.size()]"
level="INFO" doc:name="Log number of running containers" />
<set-variable variableName="numberOfContainers" value="#[payload.size()]"
doc:name="Set number of running containers " />
<choice doc:name="Is Scaling Required?">
<when
expression="#[flowVars.usage > 54200 && flowVars.numberOfContainers < 2 ]">
<docker:run-container config-ref="Docker__HTTP_Docker_Config"
imageName="runapp" containerName="runappApplication1" doc:name="Create container">
<docker:command>
<docker:command>/bin/sh</docker:command>
<docker:command>write.sh</docker:command>
</docker:command>
</docker:run-container>
<logger message="Created new container !" level="INFO"
doc:name="Log Scale up Results" />
</when>
<otherwise>
<logger level="INFO" doc:name="Default Logger"
message="Default logger !" />
</otherwise>
</choice>
</flow>
</mule>
Tip
For using streaming functionality of Docker connector proper Processing Strategy and polling frequency should be set. In the above example queued-asynchronous-processing-strategy is used and polling frequency is set to 60000 ms.
-
In Anypoint Studio, click File > New > Mule Project, name the project, and click OK.
-
In the search field, type http and drag the HTTP connector to the canvas.
-
Click the HTTP connector, click the green plus sign to the right of Connector Configuration, and in the next screen, click OK to accept the default settings.
-
In the Search bar type docker and drag the Docker connector onto the canvas. Configure as before.
-
Click the green plus sign to the right of Connector Configuration to select among the HTTP or HTTPS configuration.
-
Fill the IP or Host Name, port number ( and client certificate directory path in case of HTTPS) and select OK.
-
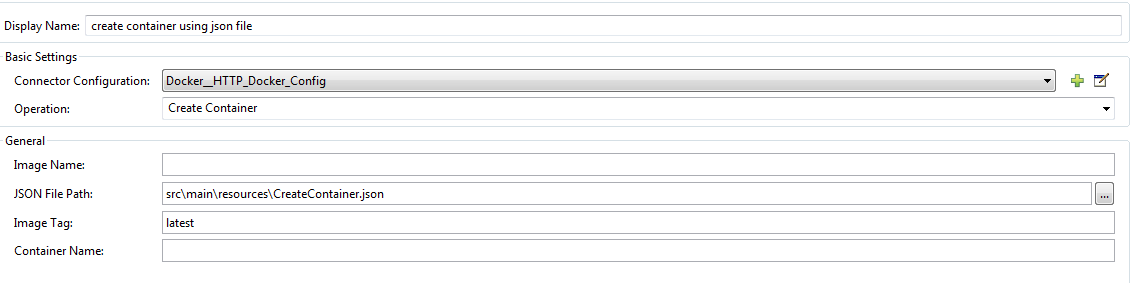
From the operation window select the Create Container operation. Enter parameters required to this operation.
-
Create createContainer.json in src/main/resources/docker and add required content as below :
{
    "Hostname": "",
    "Domainname": "",
    "User": "",
    "AttachStdin": false,
    "AttachStdout": true,
    "AttachStderr": true,
    "Tty": false,
    "OpenStdin": false,
    "StdinOnce": false,
    "Env": [
        "FOO=bar",
        "BAZ=quux"
    ],
    "Cmd": [
        "date"
    ],
    "Entrypoint": "",
    "Image": "ubuntu",
    "Labels": {
        "com.example.vendor": "Acme",
        "com.example.license": "GPL",
        "com.example.version": "1.0"
    },
    "WorkingDir": "/home",
    "NetworkDisabled": false,
    "MacAddress": "12:34:56:78:9a:bc",
    "StopSignal": "SIGTERM",
    "HostConfig": {
        "Binds": [
            "/tmp:/tmp"
        ],
        "Tmpfs": {
            "/run": "rw,noexec,nosuid,size=65536k"
        },
        "Links": [
            "redis3:redis"
        ],
        "Memory": 0,
        "MemorySwap": 0,
        "MemoryReservation": 0,
        "KernelMemory": 0,
        "CpuPercent": 80,
        "CpuShares": 512,
        "CpuPeriod": 100000,
        "CpuQuota": 50000,
        "CpusetCpus": "0,1",
        "CpusetMems": "0,1",
        "IOMaximumBandwidth": 0,
        "IOMaximumIOps": 0,
        "BlkioWeight": 300,
        "BlkioWeightDevice": [
            {}
        ],
        "BlkioDeviceReadBps": [
            {}
        ],
        "BlkioDeviceReadIOps": [
            {}
        ],
        "BlkioDeviceWriteBps": [
            {}
        ],
        "BlkioDeviceWriteIOps": [
            {}
        ],
        "MemorySwappiness": 60,
        "OomKillDisable": false,
        "oomScoreAdj": 500,
        "PidMode": "",
        "PidsLimit": -1,
        "PortBindings": {
            "22/tcp": [
                {
                    "HostPort": "11022"
                }
            ]
        },
        "PublishAllPorts": false,
        "Privileged": false,
        "ReadonlyRootfs": false,
        "Dns": [
            "8.8.8.8"
        ],
        "DnsOptions": [
            ""
        ],
        "DnsSearch": [
            ""
        ],
        "ExtraHosts": null,
        "VolumesFrom": [
            "parent",
            "other:ro"
        ],
        "CapAdd": [
            "NET_ADMIN"
        ],
        "CapDrop": [
            "MKNOD"
        ],
        "GroupAdd": [
            "newgroup"
        ],
        "RestartPolicy": {
            "Name": "",
            "MaximumRetryCount": 0
        },
        "NetworkMode": "bridge",
        "Devices": [],
        "Sysctls": {
            "net.ipv4.ip_forward": "1"
        },
        "Ulimits": [
            {}
        ],
        "LogConfig": {
            "Type": "json-file",
            "Config": {}
        },
        "SecurityOpt": [],
        "StorageOpt": {},
        "CgroupParent": "",
        "VolumeDriver": "",
        "ShmSize": 67108864
    },
    "NetworkingConfig": {
        "EndpointsConfig": {
            "isolated_nw": {
                "IPAMConfig": {
                    "IPv4Address": "172.20.30.33",
                    "IPv6Address": "2001:db8:abcd::3033"
                },
                "Aliases": [
                    "server_x",
                    "server_y"
                ]
            }
        }
    }
}
Note
Above complete JSON is not mandatory, subset of these options can be provided as input. Options except ExposedPorts, Volumes and Healthcheck are supported in the create container operation.
For more information refer Docker create container API.
Example JSON:
{
    "HostConfig": {
        "Binds": [
            "/tmp:/tmp"
        ]
    }
}
Operation parameters looks like
:
-
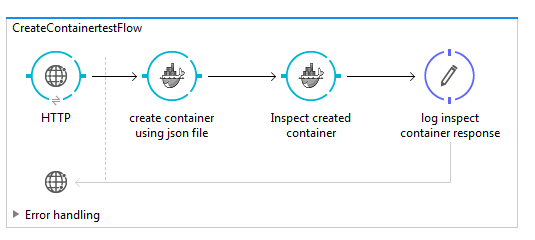
Drag the logger onto the canvas and from the operation window select the Inspect Container operation. Enter Container Name as #[payload.id].
-
Drag the logger onto the canvas and log #[payload] to view low level information of created container.
-
After you create the flows, right-click the project name in the and click Run As > Mule Application.
Example Use Case Code :
Paste this XML code into Anypoint Studio to experiment with the flow described in the previous section.
<?xml version="1.0" encoding="UTF-8"?>

<mule xmlns:context="http://www.springframework.org/schema/context" xmlns:tracking="http://www.mulesoft.org/schema/mule/ee/tracking" xmlns:http="http://www.mulesoft.org/schema/mule/http" xmlns:docker="http://www.mulesoft.org/schema/mule/docker" xmlns="http://www.mulesoft.org/schema/mule/core" xmlns:doc="http://www.mulesoft.org/schema/mule/documentation"
    xmlns:spring="http://www.springframework.org/schema/beans"
    xmlns:xsi="http://www.w3.org/2001/XMLSchema-instance"
    xsi:schemaLocation="http://www.springframework.org/schema/beans http://www.springframework.org/schema/beans/spring-beans-current.xsd
http://www.mulesoft.org/schema/mule/core http://www.mulesoft.org/schema/mule/core/current/mule.xsd
http://www.mulesoft.org/schema/mule/http http://www.mulesoft.org/schema/mule/http/current/mule-http.xsd
http://www.mulesoft.org/schema/mule/docker http://www.mulesoft.org/schema/mule/docker/current/mule-docker.xsd
http://www.springframework.org/schema/context http://www.springframework.org/schema/context/spring-context-current.xsd
http://www.mulesoft.org/schema/mule/ee/tracking http://www.mulesoft.org/schema/mule/ee/tracking/current/mule-tracking-ee.xsd">
    <http:listener-config name="HTTP_Listener_Configuration" host="0.0.0.0" port="8081" doc:name="HTTP Listener Configuration"/>
    <docker:HTTP-Docker-Config name="Docker__HTTP_Docker_Config" dockerHostIP="${docker.host}" dockerHostPort="${docker.port}" doc:name="Docker: HTTP Docker Config"/>
    <context:property-placeholder location="mule-app.properties"/>
    <flow name="CreateContainertestFlow">
        <http:listener config-ref="HTTP_Listener_Configuration" path="/" doc:name="HTTP"/>
        <docker:create-container config-ref="Docker__HTTP_Docker_Config"  jsonFilePath="src\main\resources\CreateContainer.json"  doc:name="create container using json file"/>
        <docker:inspect-container config-ref="Docker__HTTP_Docker_Config" containerName="#[payload.id]" doc:name="Inspect created container"/>
        <logger level="INFO" doc:name="log inspect container response" message="#[payload]"/>
    </flow>
</mule>
Resources
-
Access the Docker Connector Release Notes.
-
Access the Docker API docs.